Hallo ihr Lieben

ich hoffe ihr seid bei der Hitze nicht zusammengeschmolzen. Im Moment ist das Wetter ja wieder ganz angenehm. (✿´ ꒳ ` )
In diesem Blogeintrag will ich euch zeigen wie meine Bilder aufgebaut sind und auf welche Art und Weise sie bei mir entstehen. Es ist nun mal nicht so, dass ich und vermutlich auch viele weitere Zeichner etwas aufs Papier bringen, was man sofort ausarbeiten könnte. Nein, dafür entstehen vielerlei Zwischenschritte im Prozess (besonders wenn man so perfektionistisch wie ich ist) bis man mal schlussendlich ans Endergebnis kommt, womit man man zufrieden ist.Das heißt aber noch lange nicht, dass man sich zu sehr versteifen muss etwas mega perfekt zu zeichnen, da man am Ende vielleicht zu steril und graphisch werden könnte, was dann dem Bild die Dynamik und Leichtigkeit nehmen würde. Das ist teilweise echt ein kleines Problem bei mir, aber ich arbeite daran. (´ω`*)
♡ ♡ ♡ ♡ ♡ ♡ ♡ ♡ ♡ ♡ ♡ ♡ ♡ ♡ ♡ ♡
Hello my dears
I hope you didn't melt in that heat. At the moment the weather is quite pleasant. (✿´ ꒳ ` ) (at least in Germany)
In this blog post I will show you how my drawings are constructed and in which way they arise. It's simply not like that, that I and probably many other artists sketch something on a piece of paper that you could work out right away. No, it causes many intermediate steps in the process (especially if you are also a little perfectionist like me) until you get to your result, with which you're satisfied.
But that doesn't mean that you have to draw perfectly, otherwise it might gets too sterile and graphically, which would take the dynamics and lightness of your picture in the end.This is sometimes really a little problem of mine, but I'm working on it. (´ω`*)

Leider bin ich eine Person, der es ziemlich schwer fällt sich Bilder im Kopf vorzustellen oder auch überhaupt Ideen für ein Motiv zu haben... Vielleicht liegt das daran, dass ich teilweise echt sehr vergesslich bin. o(*´д`*)o
Auf jedenfall scribble ich immer meine kleinen Einfälle fürs Erste ziemlich klein (unter 10cm also wirklich klein XD) in mein Skizzenbuch, wenn ich es dabei habe.
♡ ♡ ♡ ♡ ♡ ♡
Unfortunately I am a person who finds it difficult to imagine pictures in my mind or even have an idea for a drawing at all ... Perhaps that's because I'm partly very very forgetful. o(*´д`*)o
In any case first I always scribble my little ideas quite small (less than 10cm so really small XD) in my sketchbook when I take it with me.

Diese Rohskizzen scanne ich meist auch nicht, sondern ziehe einfach nur noch ein Handyfoto auf den Computer und beginne es grob in Paint Tool Sai auszuarbeiten und auch vieles zu verändern. Hier habe ich beispielsweise die Winkel der Arme und Beine gewechselt, die Proportionen ausgebessert und für die Figur ein anderes Outfit überlegt. ♡
♡ ♡ ♡ ♡ ♡ ♡
Mostly I don't scann these rough sketches, I simply put only a cell phone photo on my computer and start to work it up and correct a lot in Paint Tool Sai. Here I've changed for example the angle of the arms and legs, touched up the proportions and considered another outfit for the character. ♡

Für das Outlinen habe ich viel lieber eine sauberere und genauere Skizze darunter, deshalb definierte ich die Linien für den Körper ein weiteres Mal aber genauer mit rot. Manche Künstler können auch super gut mit groben Skizzenmaterial umgehen, aber auf diese Art fällt es mir wirklich leichter und ich muss mich nicht mit losen Linien rumplagen. Außerdem arbeite ich dadurch im Endeffekt schneller. ヽ( ・∀・)ノ
♡ ♡ ♡ ♡ ♡ ♡
For outlining I prefer a cleaner and more accurate sketch below, so I defined the lines of the body a second time but more accurately with red. Some artists can deal with rough sketches material super well, but in this way it's really easier for me and I don't have to struggle with loose lines. I also work more quickly in the end. ヽ( ・∀・)ノ

Mit einer recht hohen Druckempfindlichkeit ziehe ich dann dünner und dicker werdende Linien, die aufeinander treffenden Stellen verdichte ich, damit an den Stellen mehr Tiefe entsteht.
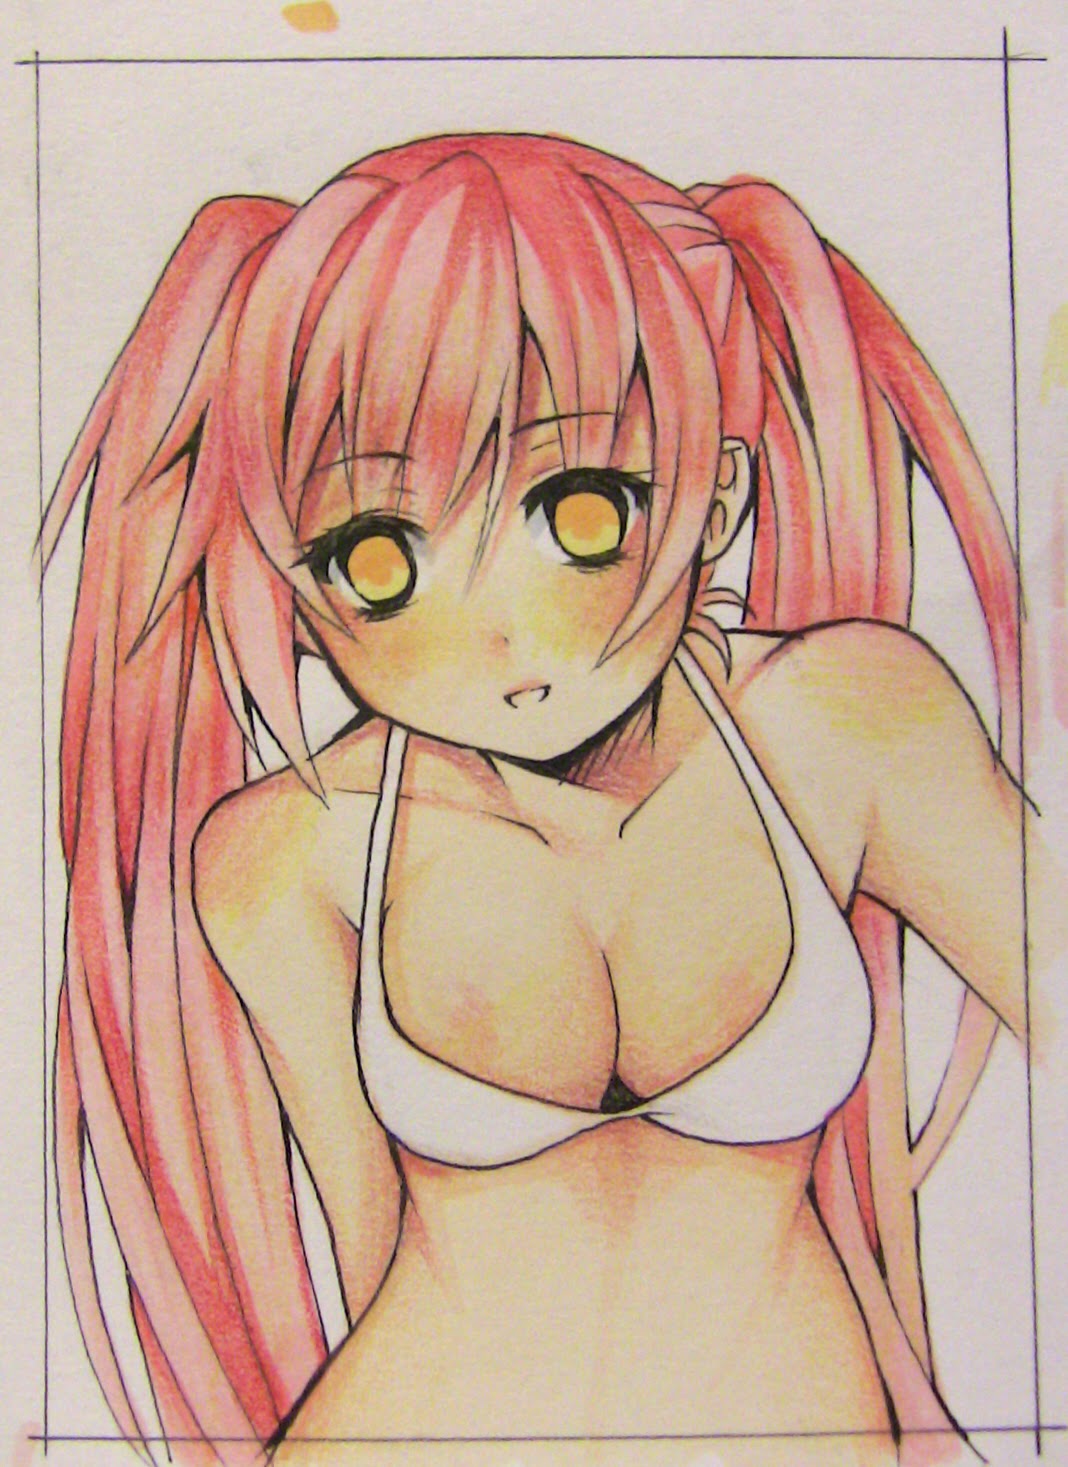
Das ist dann also mein Endergebnis des Linearts meines Motives. Ich arbeit oft viel zu sauber, weshalb ich sehr viel Zeit und Nerven brauche (sodass ich oft keine Lust mehr habe manche Bilder fertigzustellen), aber blöderweise kann es aus diesem Grund auch zu starr und unlebhaft wirken.
♡ ♡ ♡ ♡ ♡ ♡
With a quite high pressure sensitivity I draw thiner and thicker becoming lines and intensify touching lines thus more depth arises at these points.
So that's my final result of the lineart from my picture. Often I work much too clean, so I need a lot of time and nerves (that's why I often have no desire to finish some images), and unfortunately it might look too rigid and not lively because of that.

Fehlt nur noch die richtige Coloration! Aber diese werdet ihr schon bald sehen, freut euch auf ein Speedpaint von mir, ich hab schon länger keins mehr gemacht. ✧*。٩(ˊᗜˋ*)و✧*。
Also auf auf! ♡
Auf jedenfall bedanke ich mich für's Lesen und hoffe, dass euch mein Beitrag gefallen und hoffentlich auch weiter geholfen hat! Ich freue mich natürlich über konstruktives feedback wie auch über Inspirationen und Vorschläge von euch für weitere Blogeinträge. :3
♡ ♡ ♡ ♡ ♡ ♡
How you might see I still had some little mistakes in the outlines which I corrected while I've added the colour base. ♡ The base colours can be changed during the further process if you work with several layers. Also you can continue improving the lineart on some points or recolor them, so that they don't stand out to much, seem soft and thus blend better into the overall picture.◝( ′ㅂ`)و ̑̑
Now only the shading is missing! But you'll see it soon, look forward to a speedpaint from me, it's been a long time since I've done one. ✧*。٩(ˊᗜˋ*)و✧*。
So let's start! ♡
In any case thank you for reading and I hope you enjoyed my post and hopefully it helped you! Of course I would be glad about constructive feedback as well as inspiration and suggestions from you for more blogentries. :3
♡ xoxoxo ♡
[EDIT]
Here is the finished speedpaint, hope you enjoy watching! ♥